
How to Set Up Your Calendly Booking
The CEC uses Calendly for booking integration. It is completely FREE and allows you to connect your calendar and your chosen conferencing system (Zoom, Teams, Google Meet etc). Set up is simple but there are some necessary settings that need to be in place. Below are the step by step guide to setting up your booking in Calendly.
Please note: you will need you Calendly link before you can proceed with completing your profile.
Step 1 - Create Your Account
Go to: www.calendly.com and select "Get Started' from the top right corner

Step 2 - Set Up How You Will Use Calendly
Select 'On my Own' & 'Schedule Meetings' from the first screen.
One the next screen select 'Education'
Then, choose the calendar you will connect. This will depend on whether you use Google (and Google Meet) or Microsoft (and Teams or Zoom)


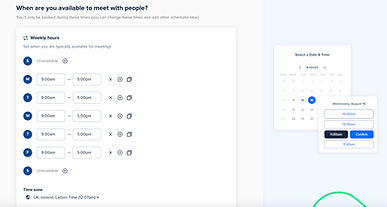
Step 3 - Set Your Working Hours
You can choose to set regular working hours, or you can amend them based on your commitments each week.
Step 4 - Connect Your Chosen Video Conferencing
Select your chosen method of delivering online lessons. Please note you will need to have set up your account with them before this stage.

Step 5 - Set Up Your Lesson Details
To set up your lesson title, and duration in 'Scheduling' select the three dots and select 'edit'. Here you can give your lesson a name e.g. Science Lesson, and set the duration e.g.1 hour.
Please note, the free Calendly only allows for one type of lesson so be generic with your title so that any student can select it.

Step 5 - Amend Email Settings
To ensure the emails parents receive are professional and contain the information they require, it is necessary to update some email settings.
Whilst in the 'edit' screen, select 'more options' on the bottom right hand side.
Then select 'Notifications and Workflows'
Then click the three dots next to 'Calendar Invitation' and select 'edit'.
The template for the email will appear. Delete the grey options and replace the title with 'Your Lesson is Scheduled'.
In the main body of the email copy and paste the following (the items in {} can be found in the 'Select + VAR' menu):
Hi {Invitee First Name},
Your lesson has been scheduled successfully.
{Event Name}
{Location}
The date and time are included in the calendar invitation attached to this email.
I look forward to seeing you then.
{My name}
Finally, save and close


Step 6 - Save Your URL
The final step is to save your URL. You will need this before you can complete your tutor profile on The CEC.
Select the drop down menu in the top right corner. Then select 'My Link'. This will open up a separate window with your URL.
You will need to copy this for your profile. It should look like: https://www.calendly.com/{your link}

